Storyboard Like a Pro

You spend hour after hour creating the perfect story for your audience. So . . . it’s only natural you want your conversation to go off without a hitch. One way to make sure this happens is to create a storyboard.
So what exactly is a storyboard? We’re glad you asked! A storyboard is a visual representation of your story. The goal of storyboarding is to transform your story idea into a relatable conversation. You don’t use it as an end design for your client. Instead you use it as a template to begin creating a story to give direction to building your conversation.
Now, are you asking yourself: “If I already have my story, do I really need to story board as well?” The answer is a resounding “Yes!”
Storyboards:
- Identify holes in your narrative.
- Illustrate what is possible on a step-by-step basis.
- Save time, as building out a presentation takes far more time than storyboarding it. Tie your story back to your client’s goals.
Step into Success
Ready to get started? Here are the four steps to build your storyboard:
- Whiteboard each step of your story in a linear flow.
- Map out the services and transitions of each step in your presentation to align with your story.
- Mock up potential views using a whiteboard or slides.
- Build your conversation and/or presentation.
An important rule of thumb: Revise your story until it makes sense, and toss aside what doesn’t work in your storyboard.
Step One: Whiteboard It Out
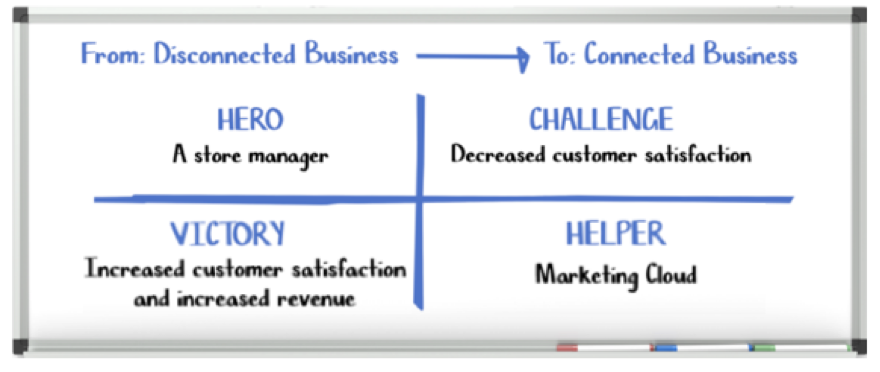
A whiteboard is a fantastic place to begin framing your story because it’s easily editable. This is where you align your hero, challenge, helper, and victory along with a timeline.
Think about it. All stories have beginnings and endings, right? Here’s the place to write that out. Let’s take a look at what this looks like for your upcoming customer presentation with Jose Summers, the local business owner we talked about earlier.
Step Two: Map It All Out
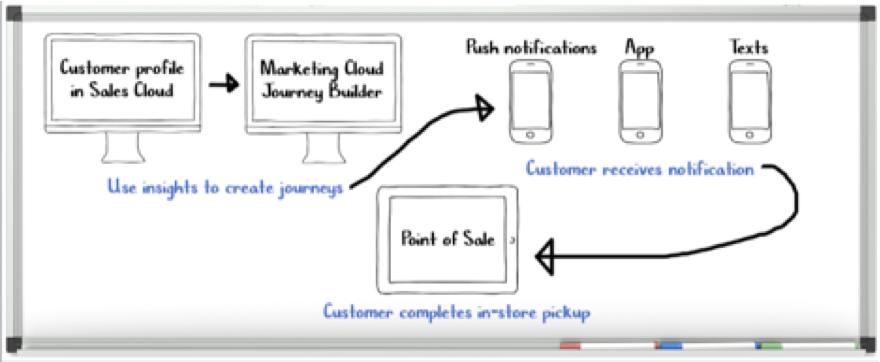
Are you using Analytics on a desktop or on an iPhone? Draw it out on your whiteboard. Are you transitioning from Analytics on an iPhone to a desktop view? Write down how you’re going to do that. By seeing each step in front of you, you clearly know where each piece of your story fits and how your transitions flow. Are you including how each step helps Jose and why he and his clients should care? If you’re feeling stuck, try shuffling around your flow and transitions for a smoother flow.
Here’s a great example of how to do this for your presentation with Jose: Once you have your flow, transitions, and client impact down, get ready to pull all of your ideas together.
HINT: It’s not about the features of your service, it’s about your story and keeping your client engaged and solving their problems, and if you use slides (you don’t need them), keep them to a minimum. Review your story flow and take out everything and anything that isn’t meaningful.
Step Three: Map Your Story Into Slides
Start planning the look of each of your services in slides. Your goal isn’t to make each slide perfect—this isn’t a presentation to your client. Instead, use these slides to see if you’re able to communicate key information to your audience while moving your story forward.
Use plain boxes with text as placeholders until you’re able to update your deck with service examples, whiteboard sketches, and story and presenter transitions. Drop these boxes quickly and easily into slides without spending tons of time.
Step Four: Build with Confidence
Now that your storyboard is locked and ready to go, ask yourself:
- What part of this conversation / presentation will be the hardest to develop?
- What will take the longest to create?
- Do I need to request some support from another team, like an associate to help build the story or related graphics?
- Most importantly, does your storyboard include persona(s) that endears the audience to the struggles and excites them with the victory?
When you design a storyboard and ask yourself these questions, you set a path for a successful delivery. So now that all of your pre-work is done, get out there and build the real thing!
SUMMARY
In this lesson we dived into the art of storyboarding, which is like the secret sauce to ensure your storytelling hits the bullseye. So, what’s a storyboard? It’s basically a visual roadmap for your story. Think of it as your guiding light to crafting a relatable conversation with your audience. While you might already have a killer story in mind, storyboarding takes it to the next level
Why is it so crucial? For starters, it helps identify any gaps in your narrative, lays out each step of your story, and saves you a ton of time when you’re building your actual presentation. It’s all about making sure your story aligns with your client’s goals. The four steps to building your storyboard are pretty straightforward: whiteboard the linear flow of your story, map out the services and transitions, mock up potential views, and finally, bring your conversation and presentation to life. Remember, it’s not about flashy slides or features; it’s about crafting a meaningful story that keeps your client engaged and solves their problems. So, roll up your sleeves and start storyboarding with confidence!